Video Game Players Guide
1. Introduction2. Game controls
3. Experience points, coins, and feathers
4. Buying and selling birds
5. Breeding birds
6. Achieving goals
a. Color-breeding goals
b. Friend and club-related goals
1. Friends and treasure chests
2. Clubs
c. Spending goals
7. Advanced strategies
a. Efficient breeding
1. The 10-pairs strategy
2. The 7-pairs strategy
3. The no-breeding "buy and sell" strategy
4. Other strategies
b. Which species to breed?
1. Low-cost "bread and butter" birds
2. High-priced "luxury" birds
c. Working the gift system
d. Cages and decorating
8. Charts
a. Breeding times and profit statistics
b. Points with the "buy and sell" strategy
c. Experience point levels
d. Goals and rewards
e. Cage prices
Birdland Paradise is a video game for bird lovers, and this is a users guide on how to get the most out of it. You can download the game for free at the app store that's appropriate for your device.
This is a bird-breeding game. There's nothing to defeat; you "win" by developing a collection of interesting, beautiful birds in attractive settings. You start out very small, with a pair of budgies. As you advance through the game you get the opportunity to breed more and more bird species, and get fancier places for your birds to live. The most experienced players end up with dozens of cages full of exotic birds.
There's an older version called Birdland 2.0 that seems to be more or less the same game with different graphics. But it feels a lot more primitive overall. A lot of the information here will be applicable to that game too.
This is not the type of game where you can log into any random device that you own and play it there. You may or may not be able to play it on more than one device if both have the same operating system. By going through Google Play, I was able to open the same account on both my Android phone and an old Android tablet, but the tablet couldn't really handle it and the graphics were messed up. My Kindle Fire tablet uses the Amazon app store, not Google, and it's not cooperating with any other device. If you put it on a PC, you might or might not be able to open it on a different PC, but it's not going to talk to anything else. It's best to assume that the device that you download it to is the device that you'll be playing on, and choose wisely. If you lose that device you probably just lost all your progress too, but at least you had fun along the way.
The game freezes up fairly regularly (at least on my device), but you can restart it easily and none of your progress is lost. Sometimes late at night it simply stops working for a while. My guess is that it's down for maintenance.
|
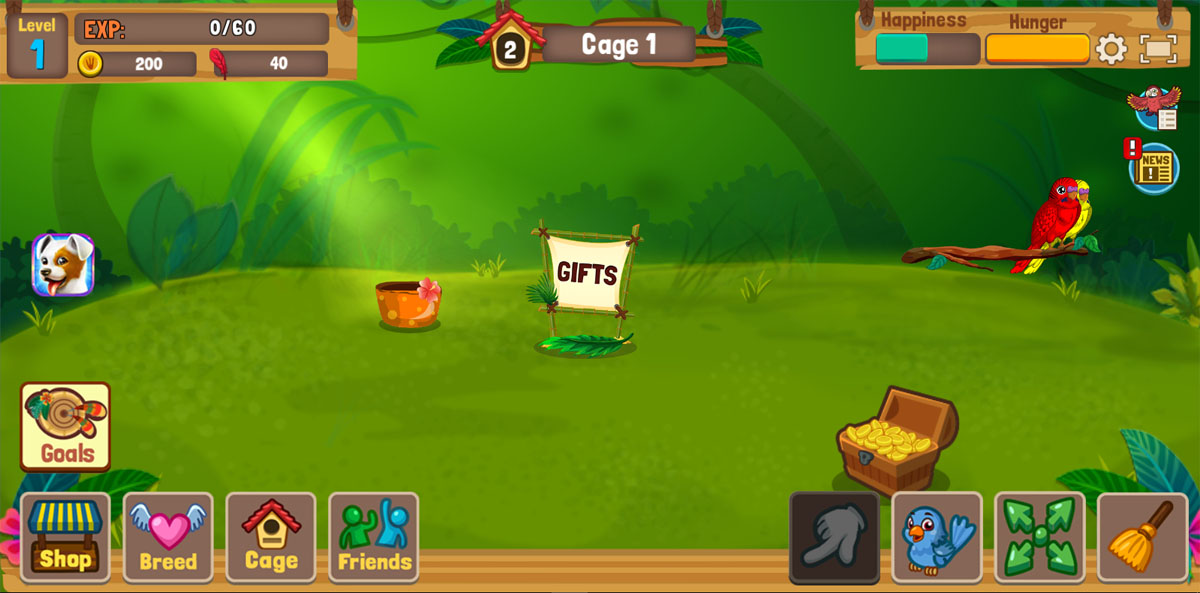
The top left corner shows your personal statistics: what level you're on, how many experience points you have, and how many coins and feathers you have.
The top center of the screen shows which cage you're in and how many birds you have in the cage. You can change the cage name so you can easily tell what's in the various cages when you look at the cage submenu.
The bars in the top right corner show how happy and well-fed the birds in this cage are. The birds in this screen shot are not as happy as they could be. To make them happier, you tickle them, aka poke them with your finger. They fly when you touch them, so it can be difficult to get them all. The gear icon is where you can adjust the settings to turn the sounds on and off. You can also run a brief tutorial here.
Beside the gear is a little square-within-a-square icon. Tap this and all the other controls disappear, so you can look at the birds and their environment without a bunch of icons spoiling the beauty of the scene. Tap this icon again and the controls come back so you can actually play the game.
Moving down the right side of the screen, there's a little icon of a macaw with a piece of paper. This is the Bird List, which gives you information on all the birds and eggs in the current cage. This is where you go when you want to sell birds or move them to a different place. You can move adults and babies to a different cage if you want to, but you can't move an egg. It has to stay in its current location until it hatches.
There's a News icon under the bird list icon. The game hasn't posted any news in years so it's useless.
You won't see it at first, but eventually there will be a small wooden sign below this with an arrowhead on it. Tap this and the chat board for your club opens up. Tap it again and it closes. I'll talk about clubs later. I haven't seen anything inappropriate myself, but there are online complaints about weirdos using the chat boards to talk to children. So parents beware.
Now let's jump back over to the left side of the screen and look at the middle-to-bottom part. The dog icon has nothing to do with the game; it's an ad for another game that they want you to play. This may not be an issue any more, but if it is you can make the icon go away by downloading the game.
What we're interested in is the Goals button. As you go through the game, there are big rewards for achieving the goals that they set for you. Click on this icon to find out what your current goals are.
The Shop button is under the Goals button. This is where you go to buy birds, supplies, decorations, and new background themes for your cages. With many items, you have to reach a certain level before you're allowed to buy it. Inside the Shop is also where you find your Inventory storage space. You can keep up to 20 birds in inventory if you've run out of space in your cages. You can also keep up to 50 items here if you've got more supplies and decorations than you need.
There's also a place for Wishes inside the Inventory. Unfortunately this is no longer active. But I happened to start right before Christmas in the last year that it was active, and they let me pick three items from the shop that were delivered on Christmas day, for free.
Next is the Breed button. This is where you go when you want your birds to make babies.
Next is the Cage button. You use this to move between your cages. Tap the icon and then choose the cage you want to go to.
Next is the Friends button. Tap here to search for people to add to your Friends list. Your Profile button is here too; you can use it to change your user name.
When you reach Level 4, a Club icon will appear next to the Friends icon.
The icons in the bottom right corner are activated for specific functions. The Hand icon will be activated most of the time, and is used for functions like tickling birds and filling food bowls. If you activate one of the other icons (like the Broom), you'll have to tap on the hand again to re-activate it and go back to your normal activities.
The Bird icon is used to identify specific birds on the screen. Tap this icon, then the bird that you're interested in, and it will tell you which bird it is.
The Move (four-arrows) button is used to move objects around the screen, to a different cage, or to Inventory. It's not used to move birds though - use the parrot icon in the top right corner for that. For some items you can also use the Move button to flip the image, and use the plus and minus buttons to enlarge or reduce the image.
The Broom icon is used for cleaning cages. The birds in this game don't poop, but every now and then you'll go into a cage and it looks like the birds had a mud fight, with dirt splattered all over the screen. Tap the broom and swipe your finger across the dirt until it's all gone. It's easy to miss a spot, but you'll get a message telling you when everything is clean. If you try to tickle a bird or fill a food bowl afterward and sparkles come off of it instead of the results you were expecting, it means that you're still in Broom mode and need to switch back to the Hand.
In the center of the screen is a leaf with a big sign above it that says "GIFTS" in large letters. There's also a treasure chest toward the bottom right corner of the screen. These things are important, but I'll talk about them later.
If a little exclamation point appears on one of the icons, it means you've got a notification there.
*******************
(Back to Top)
Experience points, coins, and feathers
There are three kinds of rewards in the game: experience points, coins and feathers. You need experience points to move to the next level. Coins and feathers are used to buy things. There are a lot of great birds and items that can only be paid for with feathers.
In real life, feathers are one of the main byproducts of having a bird, and you'll spend a lot of time sweeping them up off the floor. But there's not a lot of money in birdkeeping. It's the opposite in this game: there's money literally lying around on the ground (well, in a treasure chest actually) just waiting for you to come pick it up. But feathers are hard to get, and it takes an effort to earn them.
It's possible to buy game coins and feathers; just try to buy something in the shop that you can't actually afford, and a screen will pop up offering to sell them to you. But no matter how much money you're willing to spend on the game, there's still a lot of cool stuff that you can't buy until you reach a certain level. You need experience points to reach these levels, and you can't buy experience points. This guide will tell you how to earn them.
Almost everything you do will result in some experience points, and most activities give you some coins too. You'll see them flying through the air when you earn them. The payoff for maintenance activities like feeding, cleaning and tickling birds is small. The payoff for breeding birds and accomplishing goals is variable; sometimes it's small and sometimes it's very large. The game itself tells you how many experience points and coins you get for buying and selling birds, and you get the same number of points when you breed them. A chart later in this article has information on the rewards for achieving goals and other activities.
Earning feathers takes a lot more effort. In the beginning, the main way to get them is by achieving the goals that the game sets for you. You'll collect two feathers per day when you empty your treasure chest, and there may be a few feathers in the gifts that you get from other people. But it's not easy to accumulate a lot of feathers, so use them wisely. Pick out the things in the shop that you really want (even if you're not at the level where you can actually buy it yet), and save your feathers for those items. A lot of the most interesting birds can only be paid for with feathers.
On some devices you can get free feathers if you download another game while you're in Bird Land Paradise. I haven't tried this option and don't know how many feathers you get. I also don't know whether this function is still available.
There are lots of opportunities to spend feathers on minor conveniences, like re-spinning the breeding wheel or speeding up the hatching of an egg. But it's generally not worth it to do this, unless you have a special reason to be in a hurry. In the long run this is not a fast-action game, so you may as well get used to waiting for things. There's a lot to do in the first five levels, but it starts slowing down after that. It will take longer to get to a new level, and it takes longer to breed the more advanced birds. There are fewer goals, which means fewer chances to earn feathers. If you don't want to spend real money buying feathers, you're better off to just put the game aside and do something else while you wait for that egg to hatch. For most game functions, the clock keeps ticking when you're not playing. So the egg will still hatch on time whether you've got the game open or not.
If you don't want to spend feathers on trivial things, there are places where you have to be very careful where you touch the screen. The game design makes it easy to click the "speed up" button by accident, and they don't ask whether you really mean it. Once you've touched that button the feathers are gone.
*******************
(Back to Top)
When you buy a bird in the shop, the game automatically alternates between male and female, but if the default gender isn't the one you want you can change it before you complete the purchase. You can't do a sex change after you've bought the bird, so make sure you're getting what you want before you tap the Buy button.
The system will automatically assign a name to any bird that you buy or breed. You can change the name any time you want to - just go into the Bird List through the parrot icon at the top of the screen and tap the little pencil icon next to the bird's name. So if you don't like the default name, it's not necessary to rename the bird before you buy it.
All birds that you buy in the shop are babies, and you will have to wait for them to grow up before you can breed them.
You sell birds by clicking the parrot icon at the top right of the screen and clicking Sell next to the bird's name. This is another place where you have to be careful because they don't ask for confirmation. Once you've touched the Sell button, the bird is gone.
You can only sell adult birds. Eggs and babies can't be sold, but if you're in a hurry you can spend some feathers to make them hatch and grow up faster.
*******************
(Back to Top)
The breeding process begins with you clicking on the Breed button. This brings up a list of every adult and baby bird in the current cage, with males on the left side and females on the right. But some of them might not actually be ready to breed yet, and the game will tell you which ones they are. You can't breed babies, but the game gives you the option to instantly turn them into adults by spending some feathers. Every time a pair of adults produces an egg, there will be a certain time period before they are able to produce another one. This time period varies according to the bird species. It's usually the same amount of time that it takes for the egg to hatch, but sometimes it's a bit less. If a bird isn't ready to breed yet, you can make it ready by spending feathers on a speed up.
Choose a bird to breed by touching it. If you have more than one species in the cage, the column for the opposite sex will change to only show birds of the same species. Choose your bird's mate and click Start Breed. The breeding cost for the pair is shown right below the Start Breed button, so before you click the button you can think about whether you really want to spend the money right now.
Once the button has been clicked, the Breeding Chance wheel appears and spins itself. There are three color zones on the wheel. The yellow zone gives the least interesting breeding results; your pair will lay an off-white egg with brown speckles on it, and inside the egg is a baby that looks exactly like one of the parents.
The green zone is more interesting. The eggshell will have colorful swirls on it indicating the color of the baby inside, and the baby will not look exactly like one of the parents. You can get special color combinations from these eggs but not from the normal ones. So if you're breeding toward a special color goal, like an all-blue macaw for example, you'll know right away whether you got it or not. Sometimes the game hides one egg behind another so you can't see it very well on the screen, but if you go to the Bird List (the parrot icon in the top right) you can see a picture of the egg and know what color it is.
However, the babies can't have a color that isn't on either one of the parents. You can get different shades of a color that the parent has, for example the baby could be light or dark blue if the parent has medium blue markings. But if there's no blue on the parents, you can't get any blue on the baby. Sometimes a color marking on the parents is so tiny that you don't even notice it, and you get a nice surprise when a baby hatches with a much bigger patch of this color.
The dark "special" zone opens up the Rainbow Roulette wheel. There's no yellow zone on this wheel; it's mostly green, with a small dark zone that has a shimmering egg in it. You'll be able to use this wheel several times over a specified number of minutes for the species that you're breeding right now. So for example if you're going to breed 10 pairs of macaws all at once and hit the Rainbow Roulette on the first pair, you'll be able to use this wheel for all ten pairs before the time runs out.
Anything that lands in the green zone on the Rainbow Roulette wheel will have a colorful eggshell, just like the green zone on the ordinary breeding wheel. When it lands in the dark shimmering-egg zone, you get a shimmering rainbow egg that grows up to be a shimmering rainbow bird.
The rainbow birds are a double-edged sword. They're nice to look at, but you can't breed them. They're basically a pretty decoration that takes up cage space that could be used by a breeding bird. You'll have to decide whether you want to keep the rainbow birds or not. If you decide to sell them, they go for the same price as an ordinary bird.
When the Rainbow Roulette wheel is activated for one species, it's de-activated for all the other species until the time runs out. So if you've got a situation where you want to breed a bird and absolutely do NOT want to get a rainbow, you can wait until the wheel has been activated for a different species, then hurry up and breed your special bird while there's no risk of getting a rainbow. For example if you're trying to build a breeding flock of shoebill storks, a pretty-but-useless rainbow stork would set your plans back by four days. If you WOULD like to get a rainbow but the wheel has been activated for a different species, just wait a few minutes for it to go back to normal and you can try for the rainbow wheel.
Whether you're on the regular wheel or the Rainbow Roulette wheel, the spinner will land on some kind of color zone. If you don't like where it landed, you can spend feathers to re-spin the wheel and hope for a better result. Then you can re-spin again if you want to, but it will cost you more. If you don't want to re-spin, just click Finish.
At this point an egg appears on the ground while sex hormones fly through the air. Well actually it's just pink and blue male/female symbols, but the adults in the audience know what's really happening. The egg will hatch after the appropriate time period for the species has passed. If you happen to be watching at the right moment you'll see the egg pop, and the baby flies out and lands on a perch. The babies look similar to adult birds but smaller. Once the baby hatches there is another time period that has to pass before the baby turns into an adult. The amount of time needed to grow up is the same as the amount of time that it took for the egg to hatch.
There's a breeding expense that you have to pay up front every time you breed a pair of birds. If you don't have enough coins to cover the cost, you won't be able to breed the birds. This up-front fee makes it expensive to build a breeding flock - you're paying to breed birds that you aren't going to sell, so you won't get any money back until you start selling their babies. In the beginning of the game you can make enough money to pay for it by achieving goals. Later in the game when there aren't as many goals, you'll need to have some established breeding flocks bringing in money so you can pay for the new birds you buy and the new breeding flocks you develop. This is discussed later in the article.
Once the eggs have been laid, the Bird List will show you the sex of the baby right away. But it takes a special trick to find out exactly what the babies look like. First of all, go to a different cage; if you stay in your current cage, this trick will show you the color of the eggs not the appearance of the full grown birds. Once you're in this other cage, click on Breed then on Logs in the bottom right corner of the screen. This will show you the appearance of the babies in recently-laid eggs (except for the cage that you're currently in). If you tap on one of the babies it will show you who the parents were. This function is only available for a limited time, and for slow-breeding birds the picture in the Logs might disappear before the egg has hatched. For fast-breeding birds, the picture might still be there after the egg has hatched.
*******************
(Back to Top)
Goals fall into several general categories. A lot of the goals in the early levels are aimed at simply teaching you how to play the game. So they'll ask you to tickle some birds (which makes them happy), fill the food bowls, buy supplies, clean cages, and other minor tasks. These are pretty self-explanatory so I won't talk about them. It's usually possible to achieve the goals without spending any feathers, except for some early goals where they ask you to re-spin the breeding wheel. There are so many "re-spin the wheel" goals that it looks like they're trying to get you hooked on doing it. The ones that do make you spend feathers to re-spin the breeding wheel give you enough feathers as a reward to compensate for the ones you had to spend. At Level 33 there's a goal to breed a red lorikeet, which requires spending some feathers to buy a lorikeet ("zombikeet") with red markings. But this is the only time that you have to spend feathers that won't be paid back when you achieve the goal.
If a goal tells you to do the same action more than once (for example "fill 15 feeders"), you can look at your goal list and it will tell you how much progress you've made; in this example, it might say that you've already filled 12 of the 15 feeders.
You're not required to fulfill these goals and can even remove them from your goal list if you're willing to spend a few feathers. But it's profitable to fulfill them even if it's something that doesn't really interest you, so you may as well go for it. Unmet goals don't stop you from progressing to the next level - you'll automatically move to the next level when you have enough experience points whether you've met the goal or not.
There's a chart later in the article listing the goals for the levels. On some devices, the number of goals that can be displayed at one time seems to be limited. You might have more goals than you can see, and the newer ones will appear when the older ones have been cleared. Or you might get a notification saying that you've met a goal that you hadn't seen yet.
The rewards are flying at you thick and fast in the early stages of the game, and if you haven't read this guide or talked to an experienced player, you won't realize that when you reach the higher levels it's suddenly going to be hard to get more feathers. There are no more goals after level 80.
Some goals could use a little more explanation.
Color-breeding goals. The first color-breeding goals are pretty simple. You start out with some plain-colored budgies and use them to produce two-colored babies. For example, breeding a red budgie with a blue budgie will sometimes (but not always) result in a red and blue baby.
A few levels later you're asked to produce a three-colored budgie. If you've been actively breeding your birds, you've probably accomplished this goal before they even ask you to do it. But if not: you take two adults who have three colors between them (for example a red and blue bird and a yellow bird, or a red and blue bird and a yellow and blue bird), and breed them together. It won't be long before you have a three-colored chick.
The color breeding goals for other species require you to start with multi-colored parents and produce a baby with fewer colors. This is a lot more difficult to do than getting multi-colored babies out of plain parents. It may take you dozens of attempts, and you might advance through a lot more levels before you finally achieve the goal. But you'll gain a lot of experience points and make a lot of money selling the birds that didn't turn out the way you wanted, so it's still helping you progress. If you're not interested in keeping the assigned species, you can always sell them all after you've achieved the goal.
Sometimes you get lucky. I achieved the Senegal color-breeding goal on my second attempt. Most of the time you're not lucky. The "breed a yellow cockatoo" goal in Level 21 may go faster if you cough up the feathers required to buy an almost-all-yellow cockatoo from the shop.
Here's an example of color reduction. One of the first color-reduction goals asks you to produce a cockatiel that's all red and yellow. Cockatiels start out with four colors on them: grey, red, yellow, and white. So you have to get rid of the grey and white. Once you've produced a couple of birds that don't have one of these colors, for example a male and female that don't have any grey, you're one step closer to meeting the goal. You can breed these birds together in hopes of getting rid of the last unwanted color (the white). Work on getting less and less white. But don't stop breeding the four-color birds or the ones with lots of white. There's a lot of random chance in color breeding, and you never know who's going to throw the baby you've been waiting for.
Friend and club-related goals.
Friends and treasure chests. In general, your "friends" in this game will be random strangers who won't even know that you've put them on your friend list unless you tip them off by leaving them a gift. You can't do anything to your friends that harms them in any way, and some of the things you do are beneficial to them. Which means that you're free to be as mercenary as you please, and shamelessly work your friend list to serve your own purposes. In fact it looks like this is actually the purpose of the friend list. You're not hurting anyone, and it's mutually beneficial to the extent that it affects other people at all.
You find friends by clicking the Friends icon and then the community tab. The game will suggest a few people. Hit the Add button for anyone that you like. If you exit and come back in again, you'll get a new list of friend suggestions. If you know a specific player that you want to have as a friend you can search for them. Be sure to type their name EXACTLY the right way, because the game frequently won't find someone if you don't bother to put capital letters in the right place.
You can have up to 50 friends (51 according to the game, but it counts you as one of the friends). But you don't really need that many. It's good to leave a few slots open so you can easily add people who prove their friend-worthiness by giving you a gift. When somebody puts you on their friend list, the game does NOT automatically put them on your list. The only people on your list will be the ones you put there yourself. You can delete unproductive friends when you need to make room for new, better friends, but the game limits the number that you can remove at one time. The game tells you the level that your prospective friends are on, so sure to add some very advanced players to your friend list. Some of the goals ask you to do a lot of minor maintenance tasks - cleaning 50 cages, filling 100 feeders, that sort of thing. Advanced players usually have a lot of cages and a lot of birds, so if you visit their cages you can get a lot done without having to seek out a lot of different people. You also know that advanced players are people who take the game seriously and didn't give up when the going got tough. If you see a pile of eggs on the ground when you visit their cages, you know they're still actively playing the game. Active friends are good. You can't get gifts from somebody who isn't playing the game any more.
When you visit someone else, the statistics that you see in the top left corner will always be your own statistics, not theirs. The goals are yours too, and some icons (like the Store and the Breed button) have disappeared. But now the Cage button opens the list of the friend's cages, and that's the main thing on the page that isn't yours. When you visit them, the game always takes you to Cage 1 first. If that cage is sparkling clean and all the birds are happy and well fed, try looking at their last cage. That's where you're most likely to find work that needs to be done, and you can work backwards through the cage list until you either meet your goal or run out of work to do. Once you're done, hit the Home button that has appeared in the bottom left corner to go back to your own cages.
Everybody has one treasure chest, which is always kept in their first cage. All treasure chests refill automatically once every 24 hours, and if you want to you can visit all your friends once a day and raid their treasure chests. You're not stealing their money, even though it feels like it at first; they'll still get the same number of coins when they go to empty the chest themselves. It's just the game's way of encouraging you to visit your friends.
In the early stages of the game this easy money seems like quite a windfall, but as you advance you'll probably think that the amount you collect isn't worth the time spent getting it. There are still times when it comes in handy though. If you're a couple hundred coins away from being able to afford something you want, or a couple hundred points away from advancing to the next level, you can reach your goal with a few quick visits. If you need 3,000 coins, it's a lot more efficient to get it through your breeding activities.
Clubs. The club icon appears at Level 4, and one of the goals for this level is to join a club. The club members will not be on your friend list unless you add them yourself, but you can do the same things with club members that you do with your friends. So now you've got more treasure chests that you can raid and more places where you can do housekeeping work for personal profit.
Many clubs require a certain experience level to join, so your first task is to find a good club that will accept you. Clubs have levels too, and a club with a higher level has a higher "boost" percentage, which affects the results when members spin the breeding wheel. So a club with a higher level is better than one with a lower level. You can only belong to one club at a time, and you have to leave the club that you're already in before the game will generate a random list of some of the other clubs that are out there. If you already know the name of a club you can search for it, and maybe the game will find it for you and show you some statistics. If someone leaves you a gift, you can click on their name and see which club they belong to (if any) and some of its statistics.
A club gets points when their members spin the breeding wheel and land in the green zone, and this member activity is what raises a club to the next level. When you leave a club you'll be taking your activity out of their system. So maybe don't be quite so crass about club-hopping, because this does have an effect on other people. If a better club invites you to join it's reasonable to accept the offer. And if you're not satisfied with your current club it's reasonable to upgrade.
But self-interest operates in both directions when it comes to clubs. The clubs are limited to having 50 members, so inactive members who aren't gaining more points aren't helping the club advance to the next level - they're holding it back. Ambitious clubs go through their member lists periodically and remove members who aren't contributing, and there's nothing wrong with that. It's actually good to belong to a club like this, because it means that you don't need to go looking for a better club. The one that you're already in is actively working to become a better club.
The members of some clubs are very chatty, and silence prevails in others. It's very helpful to belong to a club where the members share game-playing tips, and it's up to you to decide whether or not you want to have a lot of chitchat about other subjects.
Spending goals. Some goals tell you to buy something very specific, so your only choice is to buy it. Others tell you to buy a certain number of items, and here you have a choice. If they didn't specify that it has to be a decorative item, you can save money by buying a bunch of feeders and perches, and moving some of them to other cages later on when you add more cages.
Some goals call for you to spend a certain amount of money, without any requirements for what you have to spend it on. But there's no need to rush out and buy stuff that you don't actually need. There's an up-front breeding cost that you have to pay every time you breed a pair of birds. So if you do nothing more than keep on breeding, you'll eventually meet the spending goal. Cages are expensive, and buying one will take you a long way toward meeting a spending goal.
*******************
(Back to Top)
For the first five levels, the rewards came at you fast, and you advanced to new levels so often that you might not have even noticed it. But at Level 6 the game starts to slow down. There aren't as many goals, and it's harder to achieve them. It takes longer to reach new levels. Cages, birds, and breeding costs are getting more expensive. You aren't living on easy street any more, and you need to have a plan if you want to go much further.
If you're working toward a color breeding goal, you can select which birds to sell and which ones to keep based on who seems most likely to help you achieve the goal. Once the goal has been achieved you can make your breeding and selling choices based on which colors you like best. I always like to keep my "founder" birds (the original one or two pairs) because you won't accidentally lose any colors that way. These are the birds that everyone else in the cage came from, so any color combination that's ever been produced in this group can be produced again later as long as you've got these birds.
Efficient breeding. Visiting other peoples' cages to raid treasure chests and do maintenance work is a good way to raise small amounts of money, but you need an efficient breeding program to make larger amounts. Running a bird mill is a very bad thing in the real world, but your cyber birds don't mind at all. They actually seem to enjoy it.
The 10-pairs strategy. Each cage can hold a maximum of 30 birds, and each egg and baby counts as a bird. You can breed efficiently with 20 adult birds - 10 males and 10 females - in each cage. Tell them all to breed, and you now have 20 adults and 10 eggs for the maximum of 30. You can't sell an egg or a baby, but once the babies have grown up you can sell any 10 birds that you want, making sure that you still have 10 males and 10 females left in the cage. Then you tell them all to breed again, and repeat the cycle.
This is a very efficient strategy for fast-breeding birds, meaning those who reach maturity less than 24 hours after the egg was laid. It's also a simple way to handle any bird where high production isn't a priority.
The ten pairs don't all have to be the same species, for example you can have
five pairs of one species and five pairs of another species. If the
breeding period is about the same for the different species, they'll all be
ready to breed again at about the same time and you can take care of all of them
during the same visit.
The 7-pairs strategy.
With slow-breeding birds, you can get even more efficiency with 7 pairs of
adults. Consider a species that takes 96 hours from egg laying to
maturity, but the adults are ready to breed again after 48 hours. If you have 10
pairs, you'll be able to sell 10 birds once every 4 days. If you have 7 pairs,
you'll be able to breed them every two days. At any given time you'll have
28 in the cage - 14 adults, 7 young birds, and 7 eggs. And every two days those
7 young birds will turn into adults, and you can sell them and breed the adults
again. You'll be selling 14 birds in every 4-day period instead of 10.
If you want to get even more from the cages where you're using the 7-pairs strategy, pick out a bird that you can buy for coins that has a lot of points. Buy two of these birds and put them in the 7-pairs cage, so that you now have a total of 30 in the cage. You can't breed these two extra birds because there isn't enough cage space, but you can sell them at maturity and get some points and coins that way. Then buy two more and repeat the cycle. You'll be selling 18 birds in a four-day period instead of the 10 you would have gotten from breeding 10 pairs.
The no-breeding "buy and sell" strategy. Most of the slow-breeding higher-level birds can only be purchased with feathers. But there are a few that can be bought for coins, and it's a lot more efficient to buy these birds and sell them at maturity than it is to breed them. Consider the wagtail for example, which spends two days in the egg and two days as a young bird. If you have ten breeding pairs in a cage you can sell 10 birds in a four-day period, and if you have seven breeding pairs you can sell 14 birds in a four-day period. Or you can fill the cage by buying 30 of them at a time and selling them at maturity, for a total of 60 birds in a four-day period. You won't make as many coins per bird with this strategy if the purchase cost is higher than the breeding cost, but you'll be able to sell a much higher number of birds and will probably make more coins overall. You'll definitely get a lot more points. This strategy doesn't work for birds that you have to buy with feathers, because feathers are hard to acquire.
If you're in the early stages of the game and can't buy the more expensive birds, you can make a nice profit buying and selling leiothrix. They're relatively cheap (2300 coins) and it only takes two hours for them to grow, with a 200-coin profit when you sell them. If you buy and sell a lot of them, the income and the experience points can be significant. Buying and selling macaws is also a good strategy in the early stages. They're cheaper than leiothrix at 1800 coins each. They take twice as long to grow (4 hours) but there's a profit of 350 coins per bird when you sell them.
With the buy-and-sell strategy, you miss out on the joys of watching special colors appear in your flock. But it's the fastest way to get more points so you can advance to the next level.
Other strategies. Adult birds can be sold immediately after they've produced an egg, so one way to breed efficiently is to sell some birds right after breeding them, and choose their replacements from the new crop of babies. But this seems overly complicated for fast-breeding birds, and it's easy to get confused and sell a bird that you really should have kept. I'll do it occasionally if I need fast money to do something else, but most of the time I just wait for the babies to grow up before I sell anyone.
But "breed and sell immediately" can be an efficient way to handle the slow breeders who take four days from egg laying to maturity, but the adults are ready to breed again in two days. If the cage is full, sell one bird to make room for an egg. Then pick two birds that you don't want to keep, breed them, and sell them immediately. Now you have enough cage space to breed two pairs. Do it and sell one pair. Keep repeating this until you run out of birds that are ready to breed. If you have a different cage that isn't full, a technique to get more eggs without having to sell anyone is to move the breedable adults into this cage temporarily, have them lay an egg, then move the parent birds back where they belong.
Which species to breed? The next question is, what birds are you going to breed? Some species breed a lot faster than others, and there are big differences in how much money you make on them. Some species are dictated to you by the goals that the game sets, but once the goal is met you can sell them all if you're not interested in that species. There are some species that you will want to keep just because you love them, regardless of how much money they bring in. But these dream birds tend to be fairly expensive, and you'll need some good "bread and butter" birds to bring money in steadily so you can afford the fancy birds.
Low-cost "bread and butter" birds. New players generally don't have a lot of money in the early stages of the game, so they need affordable birds that they can breed frequently for a steady cash flow. There's a chart later in the article showing the breeding speed and profitability of the birds that I've played with so far. Budgies are the fastest breeders; tell a pair of budgies to breed, and 6 minutes later the baby is all grown up. It's even faster if you use the free speed-up button. At the non-speeded-up rate it's theoretically possible to breed a pair ten times an hour. If you've got a breeding flock of 10 pairs, that's 100 birds an hour. You can't actually be that efficient, since there isn't a "breeding orgy" option where one press of the button tells everyone to pick a partner and make babies. You have to select each pair individually and tell them to breed, which takes some time.
But even though they're very prolific, budgies aren't very profitable. You make a profit of 10 coins per bird when you sell a budgie, so even if you've got 10 pairs working nonstop that's only 1000 coins an hour at the most. And it takes almost constant attention from you to keep the babies coming.
Lovebirds are the second-fastest breeders, and they're also quite profitable. Babies reach adulthood half an hour after their egg was laid, and there's a profit of 120 coins when you sell a lovebird. If you have ten pairs working nonstop, you'll make 2400 coins an hour. That's a lot more than the budgies deliver! But you have to sleep sometime, and your lovebirds will stop working for you when you're not there to push the Breed button. So it's good to also have some longer-breeding birds that don't need so much attention.
Cockatiels, leiothrix and macaws are good steady-breeder birds. The tiels aren't as fast or as profitable as lovebirds, but you don't have to fiddle with them as often. 10 pairs of cockatiels will give you a profit of 2000 coins after three hours of breeding time, compared to the 1200 coins in half an hour that you can get from 10 pairs of lovebirds. But the cockatiels combine fairly low maintenance with a fairly short turnaround time, so it's not a bad deal. You'd have to breed 10 pairs of budgies a dozen times to get the same amount of profit that you get from breeding 10 pairs of cockatiels just once.
Ten pairs of leiothrix give you a profit of 5,000 coins after 4 hours of breeding time. That's a better pay rate per hour than you get with lovebirds, cockatiels and macaws.
Ten pairs of macaws will give you a profit of 7,000 coins after 8 hours of breeding time. That's a nice haul, but you do have to wait longer for the money than you do with lovebirds, cockatiels and leiothrix. That's why it's good to have 10 pairs each of lovebirds, cockatiels, leiothrix and macaws. You can get money quickly when you've got time to spend on breeding activities, and you can also keep the money flowing when you haven't got much time.
Work all your other birds too of course, but in this game lovebirds, cockatiels, and macaws are the most efficient money-makers at the lower end of the birdkeeping spectrum.
Budgies are great for producing a lot of birds in a short time. So if you've got a goal that calls for large numbers (like selling 100 birds for example), you can crank up the budgie breeding machine and the goal will soon be met. But once you've advanced a few levels it's easiest to let them rest most of the time. Lovebirds, cockatiels, and macaws do a much better job of bringing in the money that you need to buy more cages and more birds. They're not as advantageous later on, when you've advanced far enough to have a lot of cages and a lot of higher-priced, slower-breeding birds. At that point, the money and experience points from these 'early' birds won't seem like very much, and you may want to let all of them rest most of the time or get rid of them entirely.
As a general rule, it's best to tell your birds to breed again as soon as you've sold the babies. It does cost money up front to breed a pair of birds. If you don't tell them to breed again right away, when it's time to get them started again you might discover that you spent too much money on other things and don't have enough left for breeding. And then you'll have to go around raiding treasure chests and whatnot to raise the necessary funds. This can't happen if you breed them right away, and you'll still have the profits from the sale to fritter away on other things. If you don't want to be bothered with active breeding for a while, you can tell them to breed and just keep the resulting 30 birds in the cage until you're ready to start the "sell and re-breed" cycle again.
In the beginning of the game, getting enough coins to do what you want is a major problem. But if you manage your breeding program well, you'll reach a point where you have more coins than you need. Then you'll be more interested in getting enough points to reach a new level, and in getting enough feathers to buy things. There's a chart at the end of the article showing which birds are the best point-getters. The best way to get feathers is by achieving goals and working the gift system.
High-priced "luxury" birds. Some of the expensive birds that you can only buy with feathers are extremely profitable. The ones that are available at a not-super-advanced stage of the game include shoebill storks, Victoria crowned pigeons, phoenixes, and motmots. You need a lot of feathers to buy a breeding pair of these birds. They're slow breeders - frequently 4 days from egg laying to maturity, and sometimes even longer. So it takes a long time to build a breeding flock of 10 pairs. But their breeding costs are fairly low, and the profits are amazing. Shoebills have a profit of 22,500 coins per bird, and the profit on Victoria crowned pigeons is 20,000 coins per bird. But the Chinese phoenix introduced in February 2018 took it to a whole new level. They have a profit of 182,400 coins per bird, and you hardly have to pay any attention to them at all. Get a few of these guys working for you and you'll be rolling in dough. The turquoise-browed motmots introduced in April 2018 have a similar profit margin.
In the past, new birds were added to the game every week, but the game is old now and no longer has these updates. So we can't expect to get any more of these exciting new birds.
Working the gift system. The gift system is your opportunity to actively cooperate with other players. You can give one gift every 24 hours to every person on your friend list and in your club, and they can return the favor by giving a gift to you. It doesn't cost anything to give a gift, other than the time you spent delivering it. The person giving the gift doesn't know what's in the package, but most of the time it's coins, somewhere between 100 and 1500. Occasionally it will be something else, like a few feathers or merchandise from the shop (a ladder, a lamp post, or a campfire). Overall, the number of feathers that you get is fairly close to the number of gifts you receive, but they give it to you in bits and pieces instead of giving you a feather with every gift.
It's mutually beneficial if you can find people to exchange gifts with on a regular basis. Here's the strategy that I used:
Every time you add someone to your friend list, visit them and leave a gift (and raid their treasure chest while you're at it). When you join a club, visit everyone (or at least the most promising-looking members) and do the same thing. Then wait to see who gives you a gift in return.
Thanks to the game's "random strangers who call you a friend" system, there will be times that you receive a gift out of the blue from someone you never heard of before. Anytime you receive a gift from someone, add them to your friend list if they're not already there to make sure you don't lose track of them.
The system makes you wait 24 hours before you can open your gift. You can spend a feather to speed up the process, but waiting is worthwhile for strategic reasons. When you're finally able to open the gift, you know that it's been at least 24 hours since the giver delivered it to you. Which means that the game will let them give you another gift right now, with no delay. So before you open your gift, visit them and leave a gift. This will remind them that they need to give you another gift if they want to keeping getting gifts from you.
If you can't leave them a gift right away because it's been less than 24 hours since the last time you did it, you have a choice to make - do you accept the gift now or wait until you can give them another gift? I prefer to wait. If I accept the gift right away I'm likely to forget to go back later and give them another one, and then they won't have a reminder that they should give more gifts to me.
The other person's treasure chest can be a good indicator of how long it's been since you gave them a gift. If you emptied the chest the last time you went there and now it's full of coins again, it's been more than 24 hours. If it's still empty, it's been less than 24 hours, and you'll have to wait a while to deliver another gift. Click on their gift center and it will tell you exactly how long you have to wait.
Unlike the treasure chest, it's possible to move your gift center to another cage, and some people have done this. Others have put so many decorations in front of their gift center that it's hard to see. But these are NOT good ideas. Make the gift center easy to find if you want gifts. People delivering gifts might not have the patience to search through a dozen cages trying to figure out where you stashed it. If you put your gift center on top of your treasure chest, the gift center will open up when people raid the chest, inviting them to leave you a gift while they're there. Make sure they can still see the treasure chest of course.
There are few goals to meet at the higher levels of the game, so working the gift system for all it's worth becomes the best way to get feathers. It seems like the number of feathers you get is approximately equal to the number of gifts you receive. The results would be pretty much the same if there was one feather in every gift, but apparently the game makers thought it would be more fun to tease us. So they made the gift process more interesting by spreading out the feathers and giving us small clumps of them every now and then.
You can delete friends who aren't giving you gifts and look for others who are more productive. You can also look for a more active club if you need to. But your friend list will eventually be full of people that you'd like to keep, and it can be hard to find a better club. Fortunately there's another little trick that can help you collect gifts without changing clubs or adding anyone to your friend list.
When you see that a new person has given you a gift, tap on their name. The screen changes, and if they belong to a club there will be a link to it. Tap on this link, and a banner for the club comes up. If there are several clubs with similar names, several banners will come up, and you may have to double check to see which one you want. Tap on the banner and the membership list for the whole club appears. You can visit everyone on the list and give them gifts if you want to, and some of them will end up giving a gift back to you. You can reach the members of a club any time you have a gift from one of them in your gift center. You can also reach club membership lists by searching for the club and tapping on its banner, but the search function doesn't always work perfectly and you may not be able to find the club you're looking for.
These techniques are apparently the only way to find out what club a specific person belongs to, or to see the membership list of a club that you don't belong to. Your friend list doesn't tell you what club your friends belong to. People who give lots of gifts often belong to clubs where there are other members who give lots of gifts, so it's good to be able to reach their club as well as your own. Players who have reached a fairly high level are more likely to be serious gifters than beginning players.
Sometimes all you see is blank space when you try to reach the membership list for another club. This is a game quirk. If you were just looking at someone who was member #49 in their club, it will take you to position #49 on the next member list that you go to. But if this club has only 24 members, there's nothing to see in that position. A similar thing can happen when you look for the club banner. If you were just looking at #8 on a list of ten clubs with similar names and then look for a club that has a unique name, you aren't going to see anything. You can make the club banner appear by swiping down the screen. This doesn't usually work with member lists, but there's another quick fix. Click the club icon on your home screen to see the member list for your own club. This list always starts at the top, and the next member list that you look at will also start at the top.
The gift clock doesn't always continue to run when you've turned off the game, so that sometimes when you open the game there's still a waiting period for gifts that should have been available hours ago. If you completely close the game and reopen it, the timer will reset and you can collect your gifts. It's actually a good idea to close and reopen before you start claiming gifts in any case, because I've noticed that sometimes the game charges you a feather when you're claiming gifts that should be free. Apparently the game didn't recognize that the speed-up button changed into a claim button. Closing the game and reopening it eliminates this problem.
Cages and decorating. The "cages" aren't really cages - they're natural habitats that the birds can fly around in freely, without a cage bar in sight. Cages are expensive, and each new one that you buy costs a lot more than the one before it. If you've got a big spending goal, simply buying a new cage will take you a long way toward meeting it, and then of course you get to fill it up with exciting new birds. There's a chart with information on cage prices later in the article.
The price of cages doesn't escalate like this in the real world, so I invented a back story to explain it. Every time you get a new cage, you have to buy the land from your neighbor, who believes there's a deposit of diamonds somewhere under the dirt. Each piece of land you get is closer to where the diamonds might be, so he keeps raising the price. You can't go digging for the diamonds yourself because the shop doesn't sell mining equipment. You can only use the land to raise birds, which is more fun anyway.
The default cage background is a tropical-looking green landscape, but you can buy other backgrounds called "themes" in the shop. The shop is loaded with lots of other decorations in a wide range of prices.
As you visit your friends and fellow club members, you'll see some amazing decorating jobs and will want to do something similar yourself. But although it's beautiful, decorating is expensive and it doesn't help you advance in the game. If you want to spend real money buying game coins and feathers, then the sky's the limit on what you can do to spiff up the cages and make them gorgeous. But if you don't want to spend real money, then in the beginning you're better off using your coins and feathers to buy cages and birds for breeding.
You can save the decorating for later on when you're more affluent. I didn't start seriously decorating until I hit Level 28, when I started to frequently have a lot of coins that I didn't need for bird-breeding activities. Get a couple of cages full of slow-breeding high-profit birds working for you, and you'll have plenty of coins for decor. The feather rewards start picking up when you hit Level 25, but you'll probably still need to budget them. You get two feathers every time you empty your own treasure chest, which adds up to 730 feathers a year. It's slow, but over time it's significant. If you've got a dozen people a day giving you gifts, there will probably be a few feathers in the haul. So even if you've gotten too lazy to pursue goals at this point, you'll still have some feathers coming in.
When your decorating budget is small you can still splurge a little in a small-scale way. In the early stages I bought a lot of Flower Stick perches, and some feeders that were fancier than they needed to be. There are some inexpensive decorations that have no useful purpose at all but they look nice. But there's a world of difference between spending 550 coins on a fancy perch, and blowing 54,000 coins on a forest theme background for a cage. If you manage your breeding activities well, you'll eventually be able to blow a million coins on the balcony theme and still have plenty of money left over.
Once you buy a theme, you can use it in as many cages as you want to with no additional charge. But once you've replaced the original background (which is quite nice) with a theme, you can't get it back again. You can switch to a different theme in that cage, but the original background is gone for good.
The game does have a neat little trick for changing the order of your cages though. You click the Cage icon then look for a small blue pencil icon in the top left corner. Clicking this icon lets you pick any cage you want to be the first cage. So if you want to have that original green background in your first cage, pick a cage that still has that background and make it Cage #1.
For a few items in the shop, the description and picture don't match. What do you actually get? You have to buy the item to find out. When you buy the "desert palm" that shows a picture of a Christmas tree, you get a large plant that looks like a Joshua tree. Very nice for desert scenes, but very different from the picture in the shop.
The bird houses can be glitchy. When you have more than one bird house in the same cage, the second one you add doesn't get used. The birds will go in the first one and the third one on up, but they don't go in the second one. If you don't want to see a bird house that isn't being used, you can buy your second bird house knowing that it is going to go to waste. Then buy another just like it, and carefully put #3 on top of #2 so number 2 is covered up. It will look like you only have two bird houses when there are actually three, and you'll see eyeballs peeping out of both of them. Another option is to buy your second bird house and hide it in the decor, and put your third one out where you can see it.
A few bird houses are glitchy in a different way. The birds don't go in these houses at all, and they do a lot more flapping than usual if one of these bird houses is in the cage. I like the flapping effect, but if you don't then you can eliminate it by getting rid of the bird house.
*******************
(Back to Top)
And now for all the charts I've been promising you.
Breeding and profit statistics. The real point of the game is to enjoy the thrill of working with special birds, even if they're only animated characters on a screen. But you need to manage your coins and feathers well so you can afford your dream birds. This chart will help you see what's involved with breeding the various species - the ones that I've played with anyway. The game has dozens of species to choose from, and there are a lot that I haven't done. In the chart below, birds are listed in the order they appear in the shop.
The hourly profit is the net profit divided by the total hours. For budgies and lovebirds, this amount is how much you'd make if you bred the pair as many times as possible in an hour. There aren't any other species where the parent birds can breed more than once an hour without using the speed up button.
| Breeding & profit info | Profit per bird | Time to raise bird |
|
Hours |
|||||
| Species | Points |
Breeding |
Sales |
Net |
Egg |
Baby |
Total |
Hourly |
|
| Budgie | 3 | 50 | 60 | 10 | 0.05 | 0.05 | 0.1 | 100 | 0.05 |
| Shoebill stork | 270 | 4,500 | 27,000 | 22,500 | 48 | 48 | 96 | 234.4 | 48 |
| Lovebird | 7 | 510 | 630 | 120 | 0.25 | 0.25 | 0.5 | 240 | 0.17 |
| Phoenix | 186 | 3,600 | 186,000 | 182,400 | 48 | 48 | 96 | 1,900 | 48 |
| Cockatiel | 12 | 1,050 | 1,250 | 200 | 1.5 | 1.5 | 3 | 66.7 | 1 |
| Hoopoe | 18 | 1,700 | 2,000 | 300 | 4 | 4 | 8 | 37.5 | 4 |
| Macaw | 18 | 1,450 | 2,150 | 700 | 4 | 4 | 8 | 87.5 | 4 | Turkey | 21 | 2,050 | 2,400 | 350 | 6 | 6 | 12 | 29.16 | 4 |
| Leiothrix | 15 | 2,000 | 2,500 | 500 | 2 | 2 | 4 | 125 | 2 |
| Hummingbird | 27 | 2,500 | 2,850 | 350 | 6 | 6 | 12 | 29.2 | 5 |
| Species | Points |
Breeding |
Sales |
Net |
Egg |
Baby |
Total |
Hourly |
Next |
| Stymphalian bird | 180 | 30,000 | 18,000 | (12,000) | 81 | 81 | 162 | NA | 81 |
| Senegal parrot | 30 | 2,300 | 2,750 | 450 | 8 | 8 | 16 | 28.1 | 8 |
| Eclectus parrot | 33 | 3,100 | 3,600 | 500 | 8 | 8 | 16 | 31.3 | 6 |
| Cock of the rock | 50 | 3,400 | 4,000 | 600 | 8 | 8 | 16 | 37.5 | 6 |
| Leprechaun parrot | 150 | 2,550 | 15,000 | 12,450 | 60 | 60 | 120 | 103.75 | 60 |
| Raven | 43 | 3,650 | 4,300 | 650 | 8 | 8 | 16 | 40.6 | 8 |
| Gouldian finch | 42 | 3,900 | 4,600 | 700 | 4 | 4 | 8 | 87.5 | 4 |
| Secretary bird | 44 | 3,800 | 4,500 | 700 | 32 | 32 | 64 | 10.9 | 32 |
| Winter gray-tailed owl | 258 | 4,300 | 25,800 | 21,500 | 60 | 60 | 120 | 179.17 | 60 |
| Bluejay | 45 | 4,600 | 5,400 | 800 | 10 | 10 | 20 | 40 | 8 |
| Species | Points |
Breeding |
Sales |
Net |
Egg |
Baby |
Total |
Hourly |
Next |
| Bat | 46 | 4,350 | 4,800 | 450 | 10 | 10 | 20 | 22.5 | 10 |
| Conure | 50 | 4,900 | 5,800 | 900 | 8 | 8 | 16 | 56.3 | 6 |
| Kingfisher | 51 | 4,900 | 5,750 | 850 | 16 | 16 | 32 | 28.22 | 16 |
| Swallow | 54 | 5,700 | 6,600 | 900 | 14 | 14 | 28 | 32.1 | 7 |
| Egg duck | 138 | 2,400 | 13,800 | 11,400 | 60 | 60 | 120 | 95 | 60 |
| Cockatoo | 60 | 6,000 | 7,000 | 1,000 | 12 | 12 | 24 | 41.7 | 12 |
| Victoria crowned pigeon | 240 | 4,000 | 24,000 | 20,000 | 48 | 48 | 96 | 208.3 | 48 |
| Feminine pigeon | 252 | 4,200 | 25,200 | 21,000 | 60 | 60 | 120 | 175 | 60 |
| Flamingo | 63 | 5,450 | 6,500 | 1,050 | 18 | 18 | 36 | 29.2 | 18 |
| Bullfinch | 141 | 2,350 | 14,100 | 11,750 | 48 | 48 | 96 | 122.4 | 48 |
| Species | Points |
Breeding |
Sales |
Net |
Egg |
Baby |
Total |
Hourly |
Next |
| Bali starling | 66 | 6,300 | 7,400 | 1,100 | 17 | 17 | 34 | 32.6 | 17 |
| Mandarin duck | 138 | 2,300 | 11,500 | 1,100 | 60 | 60 | 120 | 95.83 | 60 |
| African grey parrot | 69 | 10,900 | 12,000 | 1,100 | 18 | 18 | 36 | 30.6 | 12 |
| Pheasant | 168 | 2,800 | 16,800 | 14,000 | 48 | 48 | 96 | 145.8 | 48 |
| Saddle billed stork | 72 | 6,100 | 7,300 | 1,200 | 24 | 24 | 48 | 25 | 24 |
| Willy wagtail | 227 | 3,000 | 22,750 | 19,750 | 48 | 48 | 96 | 205.7 | 48 |
| Puffin | 150 | 2,500 | 15,000 | 12,500 | 60 | 60 | 120 | 104.2 | 60 |
| Pitta | 75 | 6,900 | 8,000 | 1,100 | 18 | 18 | 36 | 30.6 | 12 |
| Asian paradise flycatcher | 76 | 6,300 | 7,500 | 1,200 | 48 | 48 | 96 | 12.5 | 48 |
| Magnificent riflebird | 78 | 6,700 | 8,000 | 1,300 | 48 | 48 | 96 | 13.5 | 48 |
| Species | Points |
Breeding |
Sales |
Net |
Egg |
Baby |
Total |
Hourly |
Next |
| Lyrebird | 268 | 2,800 | 16,800 | 14,000 | 60 | 60 | 120 | 123.3 | 60 |
| Pigeon | 83 | 7,700 | 9,000 | 1,300 | 20 | 20 | 40 | 32.5 | 12 |
| Rosella | 270 | 2,400 | 23,000 | 20,600 | 48 | 48 | 96 | 214.6 | 48 |
| Toucan | 84 | 7,900 | 9,300 | 1,400 | 24 | 24 | 48 | 29.2 | 24 |
| Tomtit | 168 | 16,800 | 2,800 | 14,000 | 60 | 60 | 120 | 116.7 | 60 |
| Astrapia | 87 | 7,450 | 8,900 | 1,450 | 24 | 24 | 48 | 30.2 | 24 |
| Albatross | 150 | 15,000 | 2,550 | 12,450 | 48 | 48 | 96 | 129.69 | 48 |
| Hummingbird hawk-moth | 180 | 3,000 | 18,000 | 15,000 | 48 | 48 | 96 | 156.25 | 48 |
| Seagull | 93 | 9,550 | 8,000 | 1,550 | 27 | 27 | 54 | 28.7 | 27 |
| Long-tailed tit | 153 | 2,550 | 15,300 | 12,750 | 48 | 48 | 96 | 132.81 | 48 |
| Species | Points |
Breeding |
Sales |
Net |
Egg |
Baby |
Total |
Hourly |
Next |
| Lorikeet | 96 | 8,400 | 9,900 | 1,500 | 48 | 48 | 96 | 15.6 | 48 |
| Skylark | 141 | 2,350 | 14,100 | 11,750 | 48 | 48 | 96 | 122.4 | 48 |
| Motmot | 186 | 3,200 | 186,000 | 182,800 | 48 | 48 | 96 | 1,904 | 48 |
| Knobbed hornbill | 215 | 18,400 | 22,000 | 3,600 | 72 | 72 | 144 | 25 | 72 |
| Saffron toucanet | 102 | 8,800 | 10,500 | 1,700 | 66 | 66 | 132 | 12.9 | 66 |
| Coua | 159 | 2,650 | 15,900 | 13,250 | 66 | 66 | 132 | 12.9 | 66 |
| Barn owl | 105 | 21,000 | 22,750 | 1,750 | 60 | 60 | 120 | 110.4 | 60 |
| Nicobar pigeon | 148 | 15,900 | 12,000 | 3,900 | 48 | 48 | 96 | 40.6 | 48 |
| Wattlebird | 108 | 9,200 | 11,000 | 1,800 | 29 | 29 | 58 | 31 | 29 |
| Angel bird | 147 | 2,450 | 14,700 | 12,250 | 60 | 60 | 120 | 102.1 | 60 |
| Species | Points |
Breeding |
Sales |
Net |
Egg |
Baby |
Total |
Hourly |
Next |
| Scarlet honeycreeper | 215 | 2,250 | 21,500 | 19,250 | 60 | 60 | 120 | 160.4 | 60 |
| Bald eagle | 111 | 9,500 | 11,350 | 1,850 | 48 | 48 | 96 | 19.3 | 48 |
| Quetzal | 114 | 10,000 | 12,000 | 2,000 | 53 | 53 | 106 | 18.9 | 53 |
| Hawk | 117 | 6,050 | 8,000 | 1,950 | 53 | 53 | 106 | 18.4 | 53 |
| Potoo | 204 | 3,400 | 20,400 | 17,000 | 60 | 60 | 120 | 141.7 | 60 |
| Mynah | 171 | 2,850 | 17,100 | 14,250 | 60 | 60 | 120 | 118.75 | 60 |
| Vulture | 120 | 10,500 | 12,500 | 2,000 | 60 | 60 | 120 | 16.7 | 60 |
| Bellbird | 147 | 12,450 | 14,700 | 2,250 | 60 | 60 | 120 | 18.75 | 60 |
| Cedar waxwing | 168 | 2,800 | 16,800 | 14,000 | 48 | 48 | 96 | 145.8 |
48 |
| Diamond dove | 162 | 2,700 | 16,200 | 13,500 | 48 | 48 | 96 | 140.6 |
48 |
| Species | Points |
Breeding |
Sales |
Net |
Egg |
Baby |
Total |
Hourly |
Next |
| Kagu | 138 | 2,800 | 16,800 | 14,000 | 48 | 48 | 96 | 145.8 | 48 |
| Chanting goshawk | 123 | 2,050 | 12,300 | 10,250 | 60 | 60 | 120 | 85.4 | 60 |
| Painted puffin | 126 | 10,900 | 13,000 | 2,100 | 72 | 72 | 144 | 14.6 | 72 |
| Guira cuckoo | 141 | 2,350 | 14,100 | 11,750 | 48 | 48 | 96 | 122.4 | 48 |
| Royal flycatcher | 132 | 11,500 | 13,700 | 2,200 | 42 | 42 | 84 | 26.2 | 42 |
| Galah | 180 | 3,000 | 18,000 | 15,000 | 48 | 48 | 96 | 156.25 | 48 |
| Sparrow | 135 | 13,750 | 16,000 | 2,250 | 62 | 62 | 124 | 18.1 | 62 |
| Bee-eater | 138 | 11,800 | 14,100 | 2,300 | 40 | 40 | 80 | 28.75 | 40 |
| Victoria's riflebird | 141 | 12,150 | 14,500 | 2,350 | 48 | 48 | 96 | 24.4 | 48 |
| Emperor penguin | 268 | 4,300 | 26,800 | 22,500 | 60 | 60 | 120 | 187.5 | 60 |
| Species | Points |
Breeding |
Sales |
Net |
Egg |
Baby |
Total |
Hourly |
Next |
| Horned sungem | 144 | 12,600 | 15,000 | 2,400 | 48 | 48 | 96 | 25 | 48 |
| Wren | 150 | 2,800 | 15,000 | 12,200 | 48 | 48 | 96 | 127.1 | 48 |
| Curl-crested aracari | 147 | 12,600 | 15,050 | 2,450 | 72 | 72 | 144 | 17 | 72 |
| Titmouse | 159 | 2,550 | 15,900 | 13,350 | 60 | 60 | 120 | 111.25 | 60 |
| Dragon | 147 | 2,450 | 14,700 | 12,250 | 60 | 60 | 120 | 25 | 60 |
| Species | Points |
Breeding |
Sales |
Net |
Egg |
Baby |
Total |
Hourly |
Next |
| Cardinal | 150 | 13,000 | 15,500 | 2,500 | 68 | 68 | 136 | 18.4 | 68 |
| Dracula parrot | 153 | 2,040 | 15,300 | 13,260 | 60 | 60 | 120 | 36.1 | 60 |
| King bird of paradise | 132 | 13,600 | 16,200 | 2,600 | 36 | 36 | 72 | 36.1 | 36 |
| Kea | 123 | 2,050 | 12,300 | 10,250 | 48 | 48 | 96 | 106.8 | 48 |
| Gambel's quail (Callipepla Gambelii) | 159 | 2,650 | 15,900 | 13,250 | 60 | 60 | 120 | 110.42 | 60 |
| Long tailed widowbird | 159 | 13,500 | 16,150 | 2,650 | 40 | 40 | 80 | 33.1 | 40 |
| Grosbeak | 147 | 2,450 | 12,250 | 2,650 | 60 | 60 | 120 | 102.1 | 60 |
| Hanging parrot | 162 | 14,000 | 16,700 | 2,700 | 40 | 40 | 80 | 33.75 | 40 |
| Violaceous trogon | 165 | 2,750 | 16,500 | 13,750 | 60 | 60 | 120 | 114.6 | 60 |
| Pelican | 114 | 1,900 | 11,400 | 9,500 | 60 | 60 | 120 | 79.17 | 60 |
| Snipe | 142 | 2,200 | 14,200 | 12,000 | 60 | 60 | 120 | 100 | 60 |
| Species | Points |
Breeding |
Sales |
Net |
Egg |
Baby |
Total |
Hourly |
Next |
| Red-capped manakin | 162 | 2,700 | 16,200 | 13,500 | 48 | 48 | 96 | 140.6 | 48 |
| Snow bunting | 141 | 2,350 | 14,100 | 11,750 | 60 | 60 | 120 | 97.92 | 60 |
| Blue bird of paradise | 171 | 14,650 | 17,500 | 2,850 | 38 | 38 | 76 | 37.5 | 38 |
| Amazon parrot | 173 | 16,000 | 18,300 | 2,300 | 48 | 48 | 96 | 24 | 48 |
| Gang-gang cockatoo | 174 | 15,000 | 18,000 | 3,000 | 40 | 40 | 80 | 37.5 | 40 |
| Brown chicken | 177 | 15,000 | 18,000 | 3,000 | 48 | 48 | 96 | 31.25 | 48 |
| Rifelman | 168 | 2,800 | 16,800 | 14,000 | 60 | 60 | 120 | 116.7 | 60 |
| Lizard canary | 141 | 2,350 | 14,100 | 11,750 | 60 | 60 | 120 | 97.9 | 60 |
| Bali bird of paradise (Greater BoP) | 190 | 17,000 | 21,000 | 4,000 | 72 | 72 | 144 | 27.7 | 72 | Killdeer | 168 | 16,800 | 2,800 | 14,000 | 60 | 60 | 120 | 116.7 | 60 |
| Species | Points |
Breeding |
Sales |
Net |
Egg |
Baby |
Total |
Hourly |
Next |
| Twelve wired bird of paradise | 189 | 16,000 | 19,150 | 3,150 | 48 | 48 | 96 | 32.8 | 48 |
| Double barred owl finch | 144 | 2,400 | 144,000 | 141,600 | 48 | 48 | 96 | 1,475 | 48 |
| American robin | 175 | 15,000 | 17,500 | 2,500 | 120 | 120 | 240 | 10.4 | 120 |
| Kiwi | 120 | 2,400 | 12,000 | 9,600 | 60 | 60 | 120 | 80 | 60 |
| Red-naped trogon | 201 | 18,150 | 21,500 | 2,850 | 61 | 61 | 122 | 23.4 | 61 |
| Fantail | 144 | 2,400 | 14,400 | 12,000 | 48 | 48 | 96 | 125 | 48 |
| Kakapo | 204 | 17,600 | 21,000 | 3,400 | 72 | 72 | 144 | 23.6 | 72 |
| Bowerbird | 150 | 2,500 | 15,000 | 12,500 | 60 | 60 | 120 | 104.17 | 60 |
| Himalayan Monal | 206 | 18,500 | 22,000 | 3,500 | 72 | 72 | 144 | 24.3 | 72 |
| Rose-ringed parakeet | 186 | 3,100 | 18,600 | 15,500 | 60 | 60 | 120 | 23.6 | 60 |
| Species | Points |
Breeding |
Sales |
Net |
Egg |
Baby |
Total |
Hourly |
Next |
| Elf owl | 210 | 18,000 | 21,500 | 3,500 | 72 | 72 | 144 | 24.3 | 72 |
| Woodpecker | 213 | 18,500 | 21,200 | 2,700 | 72 | 72 | 144 | 18.75 | 72 |
| Helmetshrike | 212 | 2,700 | 21,200 | 18,500 | 60 | 60 | 120 | 154.2 | 60 |
| Jackdaw | 155 | 15,500 | 2,500 | 13,000 | 60 | 60 | 120 | 108.3 | 60 |
| Magpie | 220 | 20,000 | 23,650 | 3,650 | 72 | 72 | 144 | 50.7 | 72 |
| Paradise tanager | 220 | 18,800 | 22,500 | 3,700 | 72 | 72 | 144 | 51.4 | 72 |
| Agel. Phoenic. (redwing blackbird) | 144 | 3,100 | 14,400 | 15,500 | 60 | 60 | 120 | 23.6 | 60 |
| Lilac breasted roller | 225 | 19,000 | 22,750 | 3,750 | 36 | 36 | 72 | 52.1 | 36 |
| Gloster canary | 230 | 50 | 22,800 | 22,750 | 48 | 48 | 96 | 237 | 48 |
| Rufous-crested coquette | 231 | 20,000 | 24,000 | 4,000 | 28 | 28 | 56 | 71.4 | 28 |
| Species | Points |
Breeding |
Sales |
Net |
Egg |
Baby |
Total |
Hourly |
Next |
| Kookaburra | 228 | 3,800 | 22,800 | 19,000 | 60 | 60 | 120 | 158.3 | 60 |
| Broadbill | 240 | 4,000 | 24,000 | 20,000 | 48 | 48 | 96 | 208.3 | 48 |
| Little auk | 276 | 4,600 | 27,600 | 23,000 | 48 | 48 | 96 | 239.6 | 48 |
| African olive pigeon | 210 | 3,500 | 21,000 | 17,500 | 60 | 60 | 120 | 145.8 | 60 |
| Inca tern | 240 | 20,500 | 24,500 | 4,000 | 72 | 72 | 144 | 27.8 | 72 |
| King vulture | 180 | 3,000 | 180,000 | 177,000 | 48 | 48 | 96 | 1,844 | 48 |
| Nutcracker | 246 | 25,900 | 30,000 | 4,100 | 40 | 40 | 80 | 51.25 | 40 |
| Tympan. Cupido (prairie chicken) | 171 | 2,850 | 17,100 | 14,250 | 48 | 48 | 96 | 148.4 | 48 |
| Species | Points |
Breeding |
Sales |
Net |
Egg |
Baby |
Total |
Hourly |
Next |
| Eagle owl | 255 | 21,750 | 26,000 | 4,250 | 72 | 72 | 144 | 29.5 | 72 |
| Bohemian waxwing | 165 | 7,550 | 165,000 | 157,450 | 24 | 24 | 48 | 3,280 | 24 |
| Krampus | 261 | 22,150 | 26,500 | 4,350 | 72 | 72 | 144 | 30.2 | 72 |
| Crossbill | 156 | 2,600 | 15,600 | 13,000 | 60 | 60 | 120 | 108.3 | 60 |
| Vini peruviana (blue lorikeet) | 264 | 23,400 | 27,000 | 3,600 | 72 | 72 | 144 | 25 | 72 |
| Bushbird | 152 | 15,200 | 2,530 | 12,670 | 48 | 48 | 96 | 264 | 48 |
| Spectacled owl | 279 | 24,000 | 28,650 | 4,650 | 42 | 42 | 84 | 55.4 | 42 |
| Booby | 168 | 2,800 | 16,800 | 14,000 | 72 | 72 | 144 | 97.2 | 72 |
| Great turaco | 294 | 30,380 | 4,900 | 25,480 | 48 | 48 | 96 | 265.4 | 48 |
*******************
(Back to Top)
Points with the "buy and sell" strategy. There are relatively few birds that you can buy for coins, and not much birdkeeping pleasure in the buy and sell strategy. There's no sensible reason to use this strategy on low-points birds unless you're in the early stages of the game and can't afford anything else. So here's just the top five for people who check their cages once a day.
You actually get twice this many points, since you get this number of points when you buy the bird and again when you sell it. But for discussion purposes it's less confusing to use the number of points listed in the game.
The birds listed below are the most profitable. But if you're not yet at the point where you can buy and sell these birds, or if you want a faster turnaround time, you can accomplish a lot with cheaper, faster-growing birds like leiothrix, macaws, conures and cockatoos.
| Species | Total |
Days from purchase |
Points |
| Rosella | 270 | 2 | 135 |
| Willy wagtail | 227 | 2 | 113.5 |
| Twelve-wired bird of paradise | 189 | 2 | 94.5 |
| Toucan | 84 | 1 | 84 |
| Pigeon | 83 | 1 | 83 |
Frismos made an error when they first introduced the rosella parrot in July 2018, and for one glorious day it gave you 27,000 points every time you bought and sold one. I bought about 900 of them, and got enough points to go from level 84 to level 114 in a single day. There was a similar error when Frismos introduced the motmot, which could be bought for coins instead of feathers at first. But in that case the bonanza was in the amount of coin profit not the points. Once in a while there was a brief, fabulous opportunity to improve your situation. But those days are gone, since new birds are no longer being added.
*******************
(Back to Top)
Experience levels. Here's the number of points that you need to reach the various levels. I don't know how many levels there are in the game, but I've seen players as high as level 141. The last cage unlocks at level 125, so there's nothing left to achieve by going further than that.
| Point range | Point range | Point range | Point range | ||||||||
| Level | From |
To |
Level | From |
To |
Level | From |
To |
Level | From |
To |
| 1 | 1 | 60 | 26 | 133,001 | 153,000 | 51 | 1,200,001 | 1,250,000 | 76 | 2,810,001 | 2,880,000 |
| 2 | 61 | 190 | 27 | 153,001 | 175,000 | 52 | 1,250,001 | 1,300,000 | 77 | 2,880,001 | 2,950,000 |
| 3 | 191 | 325 | 28 | 175,001 | 200,000 | 53 | 1,300,001 | 1,350,000 | 78 | 2,950,001 | 3,040,000 |
| 4 | 326 | 650 | 29 | 200,001 | 230,000 | 54 | 1,350,001 | 1,400,000 | 79 | 3,040,001 | 3,110,000 |
| 5 | 651 | 1,150 | 30 | 230,001 | 265,000 | 55 | 1,400,001 | 1,450,000 | 80 | 3,110,001 | 3,180,000 |
| 6 | 1,151 | 2,000 | 31 | 265,001 | 305,000 | 56 | 1,450,001 | 1,500,000 | 81 | 3,180,001 | 3,250,000 |
| 7 | 2,001 | 2,950 | 32 | 305,001 | 350,000 | 57 | 1,500,001 | 1,560,000 | 82 | 3,250,001 | 3,350,000 |
| 8 | 2,951 | 4,200 | 33 | 350,001 | 390,000 | 58 | 1,560,001 | 1,620,000 | 83 | 3,350,001 | 3,500,000 |
| 9 | 4,201 | 5,700 | 34 | 390,001 | 430,000 | 59 | 1,620,001 | 1,780,000 | 84 | 3,500,001 | 4,000,000 |
| 10 | 5,700 | 7,300 | 35 | 430,001 | 470,000 | 60 | 1,780,001 | 1,840,000 | 85 | 4,000,001 | 4,200,000 |
| 11 | 7,301 | 9,300 | 36 | 470,001 | 510,000 | 61 | 1,840,001 | 1,900,000 | 86 | 4,200,001 | 4,400,000 |
| 12 | 9,301 | 12,000 | 37 | 510,001 | 550,000 | 62 | 1,900,001 | 1,960,000 | 87 | 4,400,001 | 4,600,000 |
| 13 | 12,001 | 15,000 | 38 | 550,001 | 600,000 | 63 | 1,960,001 | 2,020,000 | 88 | 4,600,001 | 4,800,000 |
| 14 | 15,001 | 17,800 | 39 | 600,001 | 650,000 | 64 | 2,020,001 | 2,080,000 | 89 | 4,800,001 | 5,050,000 |
| 15 | 17,801 | 20,800 | 40 | 650,001 | 700,000 | 65 | 2,080,001 | 2,140,000 | 90 | 5,050,001 | 5,200,000 |
| 16 | 20,801 | 24,000 | 41 | 700,001 | 750,000 | 66 | 2,140,001 | 2,200,000 | 91 | 5,200,001 | 5,350,000 |
| 17 | 24,001 | 27,500 | 42 | 750,001 | 800,000 | 67 | 2,200,001 | 2,260,000 | 92 | 5,350,001 | 5,500,000 |
| 18 | 27,501 | 32.300 | 43 | 800,001 | 850,000 | 68 | 2,260,001 | 2,320,000 | 93 | 5,500,001 | 5,650,000 |
| 19 | 32,301 | 40,000 | 44 | 850,001 | 900,000 | 69 | 2,320,001 | 2,390,000 | 94 | 5,650,001 | 5,800,000 |
| 20 | 40,001 | 50,000 | 45 | 900,001 | 950,000 | 70 | 2,390,001 | 2,460,000 | 95 | 5,800,001 | 6,000,000 |
| 21 | 50,001 | 62,000 | 46 | 950,001 | 1,000,000 | 71 | 2,460,001 | 2,530,000 | 96 | 6,000,001 | 6,200,000 |
| 22 | 62,001 | 75,000 | 47 | 1,000,001 | 1,050,000 | 72 | 2,530,000 | 2,600,000 | 97 | 6,200,001 | 6,400,000 |
| 23 | 75,001 | 90,000 | 48 | 1,050,001 | 1,100,000 | 73 | 2,600,001 | 2,670,000 | 98 | 6,400,001 | 6,600,000 |
| 24 | 90,001 | 116,000 | 49 | 1,100,001 | 1,150,000 | 74 | 2,670,001 | 2,740,000 | 99 | 6,600,001 | 7,000,000 |
| 25 | 116,001 | 133,000 | 50 | 1,150,001 | 1,200,000 | 75 | 2,740,001 | 2,810,000 | 100 | 7,000,001 | 8,000,000 |
| **Highest levels listed in a slightly different format** | |||||||||||
| 101 | 8,000,001 | 9,000,000 | 108 | 15,000,001 | 17,000,000 | 115 | 35,000,001 | 40,000,000 | 122 | 70,000,001 | 75,000,000 |
| 102 | 9,000,001 | 10,000,000 | 109 | 17,000,001 | 19,000,000 | 116 | 40,000,001 | 45,000,000 | 123 | 75,000,001 | 80.000.000 |
| 103 | 10,000,001 | 11,000,000 | 110 | 19,000,001 | 21,000,000 | 117 | 45,000,000 | 50,000,000 | 124 | 80,000,001 | 90,000,000 |
| 104 | 11,000,001 | 12,000,000 | 111 | 21,000,001 | 23,000,000 | 118 | 50,000,001 | 55,000,000 | 125 | 90,000,001 | 95,000,000 |
| 105 | 12,000,001 | 13,000,000 | 112 | 23,000,001 | 26,000,000 | 119 | 55,000,001 | 60,000,000 | 126 | There are more levels | |
| 106 | 13,000,001 | 14,000,000 | 113 | 26,000,001 | 30,000,000 | 120 | 60,000,001 | 65,000,000 | but there's no reward | ||
| 107 | 14,000,001 | 15,000,000 | 114 | 30,000,001 | 35,000,000 | 121 | 65,000,001 | 70,000,000 | |||
*******************
(Back to Top)
Goals and rewards. Here are the rewards for doing ordinary tasks. Note: it costs you money to fill your own feeders; you don't get paid for it. But "no feedee no breedee", so keep your birds well fed. The cost varies depending on the feeder.
| Ordinary tasks | Feathers |
Exp pts |
Coins |
| Tickling your own birds | 0 | 3 | 7 |
| Tickling someone else's birds | 0 | 0 | 1 |
| Filling your own empty feeders | 0 | 3 | See above |
| Filling someone else's empty feeders | 0 | 1 | 0 |
| Cleaning your own cage | 0 | 9 | 0 |
| Cleaning someone else's cage | 0 | 9 | 0 |
| Emptying your own treasure chest | 2 | 10 | 200 |
| Emptying someone else's treasure chest | 0 | 3 | 15 |
Here are the goals and rewards for each level. Notice how the cash rewards increase a lot more dramatically than the feather rewards do. Speeding up your advancement by buying and selling birds seems to make the higher goals arrive more slowly, meaning that you might have to reach a higher level than what this chart shows before you get the goal. But you should get them all eventually.
| Level | Goal | Feathers |
Exp pts |
Coins |
|||||||
| 1 | Buy a stick perch in the shop | 1 | 2 | 130 | |||||||
| 1 | Fill your first feeder | 0 | 2 | 50 | |||||||
| 1 | Empty your treasure chest | 0 | 5 | 30 | |||||||
| 1 | Breed a baby budgie | 2 | 3 | 60 | |||||||
| 1 | Tickle your birds | 0 | 6 | 60 | |||||||
| 1 | Buy 2 blue budgies | 0 | 4 | 60 | |||||||
| 1 | Buy a water tank | 2 | 2 | 60 | |||||||
| 1 | Breed a yellow and blue budgie | 2 | 3 | 60 | |||||||
| 1 | Breed a red and blue budgie | 2 | 3 | 60 | |||||||
| 1 | Re-spin the breeding wheel twice | 3 | 10 | 80 | |||||||
| Level | Goal | Feathers |
Exp pts |
Coins |
|||||||
| 2 | Sell two birds | 2 | 4 | 120 | |||||||
| 2 | Add 5 friends | 4 | 8 | 100 | |||||||
| 2 | Empty 5 treasure chests in friends' cages | 3 | 5 | 200 | |||||||
| 2 | Clean a friend's cage | 3 | 8 | 150 | |||||||
| 2 | Give 5 gifts | 0 | 5 | 70 | |||||||
| 2 | Tickle 10 birds belonging to friends | 2 | 7 | 80 | |||||||
| 2 | Fill 10 feeders in friends' cages | 4 | 11 | 80 | |||||||
| 2 | Buy 7 accessories or decorations from the shop | 2 | 3 | 750 | |||||||
| 2 | Spend 1,000 coins on new stuff or bird breeding | 1 | 3 | 600 | |||||||
| Level | Goal | Feathers |
Exp pts |
Coins |
|||||||
| 3 | Buy a new theme for your first cage | 3 | 6 | 500 | |||||||
| 3 | Buy your second cage | 4 | 8 | 250 | |||||||
| 3 | Buy two lovebirds for the second cage | 4 | 13 | 800 | |||||||
| 3 | Buy a cocktail feeder for the second cage | 2 | 5 | 125 | |||||||
| 3 | Buy a water tank for the second cage | 2 | 3 | 125 | |||||||
| Level | Goal | Feathers |
Exp pts |
Coins |
|||||||
| 4 | Breed a baby lovebird | 3 | 15 | 500 | |||||||
| 4 | Buy 8 items from the shop for the second cage | 3 | 20 | 1,000 | |||||||
| 4 | Spend 3,000 coins | 4 | 9 | 50 | |||||||
| 4 | Re-spin the breeding wheel four times | 4 | 10 | 150 | |||||||
| 4 | Breed 5 pairs of budgies in your first cage | 4 | 5 | 750 | |||||||
| 4 | Sell four birds | 4 | 9 | 150 | |||||||
| 4 | Join a club | 7 | 10 | 200 | |||||||
| 4 | Breed an all-yellow lovebird | 4 | 25 | 350 | |||||||
| 4 | Breed an all-green lovebird | 5 | 10 | 200 | |||||||
| 4 | Add 5 more friends | 3 | 12 | 350 | |||||||
| 4 | Give 5 gifts | 3 | 12 | 500 | |||||||
| 4 | Clean 3 cages | 4 | 15 | 460 | |||||||
| 4 | Empty 5 treasure chests | 3 | 10 | 300 | |||||||
| 4 | Tickle 15 of your friends' birds | 3 | 12 | 350 | |||||||
| 4 | Fill 15 feeders in your friends' cages | 3 | 12 | 450 | |||||||
| 4 | Breed 5 pairs of lovebirds in your second cage | 5 | 13 | 1,100 | |||||||
| 4 | Re-spin the breeding wheel seven times | 7 | 13 | 500 | |||||||
| Level | Goal | Feathers |
Exp pts |
Coins |
|||||||
| 5 | Buy or set a new theme for your second cage | 0 | 13 | 300 | |||||||
| 5 | Sell 15 birds | 6 | 15 | 500 | |||||||
| 5 | Buy your third cage | 3 | 12 | 800 | |||||||
| 5 | Buy 2 cockatiels for the third cage | 4 | 10 | 450 | |||||||
| 5 | Buy 2 cocktail feeders in the third cage | 3 | 10 | 180 | |||||||
| 5 | Breed a baby cockatiel | 1 | 10 | 300 | |||||||
| 5 | Breed a cockatiel that's only red and yellow | 7 | 25 | 2,000 | |||||||
| 5 | Breed a cockatiel that's only white and grey | 5 | 15 | 1,600 | |||||||
| 5 | Breed 15 pairs of birds | 4 | 18 | 1,500 | |||||||
| 5 | Buy 10 items in the third cage | 4 | 16 | 2,100 | |||||||
| 5 | Spend 5,000 coins | 4 | 19 | 2,000 | |||||||
| 5 | Tickle 50 birds | 4 | 5 | 1,500 | |||||||
| Level | Goal | Feathers |
Exp pts |
Coins |
|||||||
| 6 | Fill 30 feeders | 3 | 16 | 2,000 | |||||||
| 6 | Put a water tank in the third cage | 1 | 18 | 480 | |||||||
| 6 | Buy a swing in the first cage | 3 | 18 | 400 | |||||||
| 6 | Breed a three-color budgie | 5 | 18 | 1,800 | |||||||
| 6 | Respin the breeding wheel 10 times | 10 | 20 | 1,900 | |||||||
| 6 | Add friends until you have 20 total | 5 | 17 | 2,800 | |||||||
| Level | Goal | Feathers |
Exp pts |
Coins |
|||||||
| 7 | Buy a fourth cage | 5 | 21 | 3,500 | |||||||
| 7 | Buy 2 apple baskets in the 4th cage | 4 | 23 | 1,300 | |||||||
| 7 | Get a pair of macaws for the 4th cage | 4 | 20 | 3,100 | |||||||
| 7 | Buy two flower sticks for the 4th cage | 4 | 22 | 1,400 | |||||||
| 7 | Breed a baby macaw in the 4th cage | 4 | 30 | 3,100 | |||||||
| 7 | Buy 12 items in the 4th cage | 4 | 23 | 5,000 | |||||||
| 7 | Give 15 gifts | 5 | 22 | 3,800 | |||||||
| 7 | Empty 15 treasure chests | 4 | 30 | 2,000 | |||||||
| 7 | Breed an all-red macaw | 8 | 40 | 1,500 | |||||||
| 7 | Breed an all-blue macaw | 11 | 75 | 2,500 | |||||||
| Level | Goal | Feathers |
Exp pts |
Coins |
|||||||
| 8 | Tickle 70 birds | 6 | 24 | 5,000 | |||||||
| 8 | Breed 10 pairs of lovebirds in the 2nd cage | 4 | 24 | 2,800 | |||||||
| 8 | Spend 20,000 coins | 3 | 24 | 1,000 | |||||||
| Level | Goal | Feathers |
Exp pts |
Coins |
|||||||
| 9 | Buy your 5th cage | 5 | 30 | 3,600 | |||||||
| 9 | Buy a pair of hummingbirds in the 5th cage | 5 | 27 | 2,800 | |||||||
| 9 | Buy 12 items in the 5th cage | 5 | 30 | 3,600 | |||||||
| 9 | Breed a baby hummingbird in the 5th cage | 3 | 20 | 1,200 | |||||||
| 9 | Buy 2 ice cream feeders in the 5th cage | 2 | 25 | 1,200 | |||||||
| 9 | Breed an all-blue hummingbird | 5 | 50 | 3,000 | |||||||
| 9 | Breed an all-purple hummingbird | 6 | 50 | 2,500 | |||||||
| Level | Goal | Feathers |
Exp pts |
Coins |
|||||||
| 10 | Breed a Senegal that's only green and grey | 8 | 30 | 5,500 | |||||||
| 10 | Clean 15 cages | 4 | 55 | 5,600 | |||||||
| 10 | Sell 25 birds | 4 | 36 | 5,300 | |||||||
| 11 | Fill 70 feeders | 6 | 50 | 7,300 | |||||||
| 11 | Spend 30,000 coins | 5 | 32 | 10,000 | |||||||
| 11 | Breed 40 birds | 6 | 60 | 8,000 | |||||||
| 11 | Breed an all-blue eclectus | 7 | 36 | 6,000 | |||||||
| Level | Goal | Feathers |
Exp pts |
Coins |
|||||||
| 12 | Give 30 gifts | 5 | 70 | 8,400 | |||||||
| 12 | Empty 30 treasure chests | 8 | 55 | 4,300 | |||||||
| 12 | Tickle 250 birds | 6 | 45 | 7,300 | |||||||
| 12 | Breed an all-grey cock of the rock | 10 | 50 | 7,300 | |||||||
| 13 | Clean 30 cages | 5 | 55 | 9,500 | |||||||
| Level | Goal | Feathers |
Exp pts |
Coins |
|||||||
| 14 | Sell 50 birds | 5 | 50 | 6,000 | |||||||
| 14 | Fill 150 feeders | 6 | 65 | 6,000 | |||||||
| 15 | Spend 100,000 coins | 9 | 90 | 22,000 | |||||||
| 16 | Breed 100 birds | 6 | 90 | 15,000 | |||||||
| 16 | Breed an all-green conure | 8 | 70 | 5,500 | |||||||
| Level | Goal | Feathers |
Exp pts |
Coins |
|||||||
| 17 | Give 55 gifts | 6 | 10 | 22,000 | |||||||
| 18 | Empty 80 treasure chests | 6 | 120 | 18,000 | |||||||
| 19 | Clean 50 cages | 7 | 140 | 26,000 | |||||||
| 20 | Breed an all-yellow cockatoo | 100 | 170 | 33,000 | |||||||
| 20 | Sell 100 birds | 6 | 180 | 19,000 | |||||||
| Level | Goal | Feathers |
Exp pts |
Coins |
|||||||
| 21 | Fill 250 feeders | 7 | 210 | 25,000 | |||||||
| 22 | No new goal. Cry because you can't earn feathers, and work toward the next level. | ||||||||||
| 23 | Spend 1 million coins | 25 | 350 | 45,000 | |||||||
| 23 | Breed an all-red African grey | 20 | 325 | 46,000 | |||||||
| 24 | Breed 200 birds | 15 | 370 | 56,000 | |||||||
| Level | Goal | Feathers |
Exp pts |
Coins |
|||||||
| 25 | Breed an Indian pitta that's only yellow and white | 8 | 400 | 70,000 | |||||||
| 25 | Give 100 gifts | 25 | 430 | 92,000 | |||||||
| 26 | Empty 100 treasure chests | 23 | 600 | 88,000 | |||||||
| 27 | Clean 150 cages | 30 | 700 | 130,000 | |||||||
| 27 | Breed an all-white pigeon | 7 | 750 | 90,000 | |||||||
| Level | Goal | Feathers |
Exp pts |
Coins |
|||||||
| 28 | Sell 300 birds | 35 | 1,000 | 180,000 | |||||||
| 28 | Breed a toucan that's only red and yellow | 30 | 1,200 | 150,000 | |||||||
| 28 | Breed a toucan that's only white and yellow | 30 | 1,200 | 150,000 | |||||||
| 29 | Fill 500 feeders | 40 | 1,700 | 200,000 | |||||||
| 30 | Spend 2 million coins | 50 | 2,800 | 300,000 | |||||||
| Level | Goal | Feathers |
Exp pts |
Coins |
|||||||
| 31 | Breed 400 birds | 50 | 3,500 | 300,000 | |||||||
| 32 | Give 200 gifts | 50 | 4,000 | 300,000 | |||||||
| 32 | Breed an all-red lorikeet | 50 | 4,000 | 300,000 | |||||||
| 33 | Empty 400 treasure chests | 50 | 5,000 | 300,000 | |||||||
| 34 | Clean 200 cages | 50 | 6,000 | 300,000 | |||||||
| 35 | Sell 500 birds | 50 | 8,000 | 300,000 | |||||||
| 35 | Breed a green and white owl | 50 | 7,500 | 225,000 | |||||||
| Level | Goal | Feathers |
Exp pts |
Coins |
|||||||
| 36 | Fill 1,000 feeders | 50 | 8,000 | 300,000 | |||||||
| 37 | No new goal. Cry because you can't earn feathers, and work toward the next level. | ||||||||||
| 38 | Spend 5 million coins | 50 | 8,000 | 350,000 | |||||||
| 39 | No new goal | ||||||||||
| 40 | Breed 1,000 birds | 50 | 8,000 | 400,000 | |||||||
| Level | Goal | Feathers |
Exp pts |
Coins |
|||||||
| 41 | No new goal | ||||||||||
| 42 | Give 500 gifts | 50 | 8,000 | 400,000 | |||||||
| 43 | No new goal | ||||||||||
| 44 | Empty 1,000 treasure chests | 60 | 10,000 | 500,000 | |||||||
| 45 | No new goal | ||||||||||
| Level | Goal | Feathers |
Exp pts |
Coins |
|||||||
| 46-47 | No new goal | ||||||||||
| 48 | Clean 500 cages | 50 | 10,000 | 500,000 | |||||||
| 49-50 | No new goal | ||||||||||
| 51 | Sell 1,000 birds | 55 | 10,000 | 500,000 | |||||||
| 52-54 | No new goal | ||||||||||
| 55 | Fill 2,000 feeders | 50 | 10,000 | 500,000 | |||||||
| 56-59 | No new goal | ||||||||||
| 60 | Spend 10 million coins | 50 | 10,000 | 600,000 | |||||||
| Level | Goal | Feathers |
Exp pts |
Coins |
|||||||
| 61-64 | No new goal | ||||||||||
| 65 | Breed 2,000 birds | 50 | 10,000 | 700,000 | |||||||
| 66-69 | No new goal | ||||||||||
| 70 | Give 1,000 gifts | 60 | 10,000 | 800,000 | |||||||
| 71-74 | No new goal | ||||||||||
| 75 | Empty 2,000 treasure chests | 60 | 10,000 | 900,000 | |||||||
| 76-79 | No new goal | ||||||||||
| 80 | Clean 1,000 cages | 60 | 10,000 | 1,000,000 | |||||||
| The End - there are no new goals after Level 80 | |||||||||||
*******************
(Back to Top)
Cage prices. You
can have a maximum of 65 cages. Each
cage you buy is more expensive than the one before it, until a dramatic price
drop takes effect for Cage 116 and beyond.
The high price of cages is one of the many reasons that you need an organized
breeding program to support your virtual birdkeeping hobby. You also can't buy cages at any
random time that you want to; you have to reach the right level first.
| Cage # | Unlocks at |
Price |
Cage # | Unlocks at |
Price |
Cage # | Unlocks at |
Price |
| 1 | Level 1 | Free | 21 | Level 42 | 320,000 | 41 | Level 82 | 2,000,000 |
| 2 | Level 3 | 600 | 22 | Level 44 | 350,000 | 42 | Level 84 | 2,200,000 |
| 3 | Level 5 | 1,500 | 23 | Level 46 | 400,000 | 43 | Level 86 | 2,500,000 |
| 4 | Level 7 | 5,000 | 24 | Level 48 | 450,000 | 44 | Level 88 | 3,000,000 |
| 5 | Level 9 | 9,000 | 25 | Level 50 | 500,000 | 45 | Level 90 | 3,500,000 |
| 6 | Level 12 | 15,000 | 26 | Level 52 | 550,000 | 46 | Level 93 | 4,000,000 |
| 7 | Level 14 | 30,000 | 27 | Level 54 | 600,000 | 47 | Level 96 | 4,500,000 |
| 8 | Level 16 | 40,000 | 28 | Level 56 | 650,000 | 48 | Level 99 | 5,000,000 |
| 9 | Level 18 | 60,000 | 29 | Level 58 | 700,000 | 49 | Level 102 | 5,500,000 |
| 10 | Level 20 | 80,000 | 30 | Level 60 | 750,000 | 50 | Level 105 | 6,000,000 |
| 11 | Level 22 | 100,000 | 31 | Level 62 | 800,000 | 51 | Level 108 | 6,500,000 |
| 12 | Level 24 | 120,000 | 32 | Level 64 | 850,000 | 52 | Level 111 | 7,000,000 |
| 13 | Level 26 | 150,000 | 33 | Level 66 | 900,000 | 53 | Level 113 | 8,000,000 |
| 14 | Level 28 | 180,000 | 34 | Level 68 | 1,000,000 | 54 | Level 114 | 9,000,000 |
| 15 | Level 30 | 200,000 | 35 | Level 70 | 1,100,000 | 55 | Level 115 | 10,000,000 |
| 16 | Level 32 | 220,000 | 36 | Level 72 | 1,200,000 | 56 | Level 116 | 50 - really! |
| 17 | Level 34 | 240,000 | 37 | Level 74 | 1,300,000 | 57 | Level 117 | 50 |
| 18 | Level 36 | 260,000 | 38 | Level 76 | 1,400,000 | 58 | Level 118 | 50 |
| 19 | Level 38 | 280,000 | 39 | Level 78 | 1,600,000 | 59 | Level 119 | 50 |
| 20 | Level 40 | 300,000 | 40 | Level 80 | 1,800,000 | 60-65 | Level 120-125 | 50 each |
*******************
(Back to Top)
Copyright 2018-2024 Carolyn Tielfan all rights reserved